5 The Techniques of the Auto Launch
5.1 Preparation.
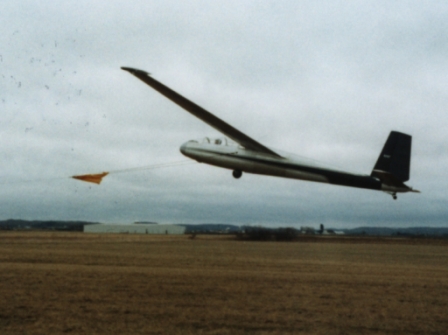
5.2 Ground run.
5.3 Liftoff.
5.4 Initial Climb.
5.5 Initial speeds.
5.6 Low rope breaks.
5.7 Round-up.
5.8 Climb.
5.9 PIO.
5.10 Autotow redline.
5.11 Crosswind correction.
5.12 Wind shear.
5.13 Roundoff.
5.14 Release.
5.15 Review.
From the glider pilot's point of view, it's useful to divide the
launch into stages:
5.1 Preparation.
After all the equipment is set up, the tow rope attached, and tow
vehicle positioned, the pilot must still prepare to fly. Before
giving the thumbs-up, the pilot must mentally run through all the
details necessary to a safe flight. A checklist is the best way to do
this. I prefer a spatial checklist that begins with the pilot and
works outward; most pilots use the ABC checklist. All these questions
must be answered before you're ready to launch:
- Is the parachute on? Belts buckled? (We'll skip food, water, and
survival gear: we're planning to fly circuits.) Hat positioned?
Seat adjusted and pedals reachable?
- Are the instruments OK? Altimeter set? Varios zero? Radio set?
- Are the levers OK? Air brakes closed and locked? Flaps set?
Gear down? Controls free and correct?
- Externally, is the rope hooked up? Is the rope lying where it
should be? Was the release tested? Is the wing runner paying
attention? What's the wind doing? What's in the sky? Is the
pattern clear? Is the tow vehicle in position, and is the driver
in it, ready to launch?
- Is the canopy closed and latched? Has the latch been checked and
verified that it's secure?
- Now you're ready to launch; the wing runner needs to recheck the
pattern and reconfirm the pattern is clear before giving the
signal to the tow vehicle.
- If there is no wing runner, one wing will be down at the start.
The upwind wing should be down. Friction will cause the glider to
yaw toward this wing. Any crosswind component will tend to lift
this wing if the downwind wind is up, reducing this initial yaw.
(If the downwind wingtip is down, a crosswind will tend to pin it,
greatly exacerbating the initial yaw. If there's a strong
crosswind component, the downwind wing may be forced down before
control effectiveness is gained: a good reason to defer launching;
a good reason to use a rolling start or snatch to take up slack.)
You can expect the yaw to be minimal if starting on pavement; on
grass, the wingtip may catch in the grass, making it yaw more
strongly. Consider what to expect before you radio to the driver
that you're ready.
5.2 Ground run.
Throughout the tow, one hand is on the stick, the other resting near
the release handle. It's not gripping it; this risks premature
release. The first sensation is the sound of the rope snapping tight,
then acceleration. This acceleration is at first slow and ponderous
if the tow vehicle starts from a dead stop; it is fast and powerful if
it makes a rolling start.
A fast start is preferable, as the pilot is at the mercy of physics
until control authority is gained. The exact speed of the rolling
start depends on the wind velocity and on the experience of the pilot
and driver. The gentler the wind, the more a rolling start is
helpful. In my experience, a standing start gets the glider started
much too slowly; a 30 mile per hour start can be safe, but is alarming
and unnecessary. Ten to at most fifteen miles an hour has worked well
for us, quickly accelerating the glider to a speed at which the
controls are effective without a frightening (to the passenger) jerk.
In the Blanik, the rudder is very powerful, and gains authority
quickly. The rudder, as always, should be used to level the wings
initially, and to pick up the down wing; the ailerons should be used
only to fine-tune control after they are fully effective. On the
Blanik L-13, if full aileron is used to lift the down wing when the
tip is touching the ground, the tip of the aileron will be abraded by
the ground. Some owners attach lightweight deflectors onto the
sponsons to prevent this.
The ground roll, then, begins with a couple seconds of yaw if there is
no wing runner. This must be observed carefully to make sure it
promptly corrects with the pull of the rope. The yaw should develop
initially, for just a second, and then begin correcting. If it does
not diminish immediately, or if it increases to the point that there's
even a hint of sideways motion by the glider, release!, as once a
ground loop has started, the hooks may jam, at least until you're
going backwards!
With a wing runner, a wing drop should not occur. The L-13 gains
aileron effectiveness at such low speeds -- about 10 knots -- that as
soon as the runner can no longer keep up, the pilot will be able to
keep the wings level. (The ailerons are effective at such low speed
that after landing directly into the wind, the pilot can often keep
both wings level and off the ground indefinitely after stopping.)
As the glider rapidly accelerates, slight forward stick pressure will
tell you when elevator effectiveness has begun. Once the tail comes
off the ground, change to gentle back pressure until the glider flies
itself off. Maintain slight back pressure, letting the glider climb
by itself, until the glider is comfortably off the ground -- 3 to six
feet -- and the controls feel firm. This will be between 40 and 50
knots, depending on CG and gross weight, and on the vigor of
acceleration. The aim is to increase the back pressure gently to
preclude development of slack in the tow rope; care must be taken to
ensure that you do not mush or stall in doing this: some slack is
better than a crash.
If acceleration stops before flying speed is attained, continue
taxiing and stay on tow as long as the rope is tight, until it's clear
whether acceleration will be resumed. This is particularly important
if you started the tow from the overrun, behind the end-marker lights,
as you need to either release in time to stop before the lights or go
through them with enough airspeed (about 12-15 knots) to maintain the
aileron effectiveness that will permit you to keep the wings level and
not strike the lights. (In the Blanik the rudder is effective nearly
to a standstill, so rudder authority is not an issue here.)
If you have been sensible and cautious, and have started on the
runway, then the first judgment, if acceleration pauses, is whether
there is ample runway to complete a takeoff. In my experience, if the
runway is shorter than about 3800 feet, there is no room for
hesitation, and any failure of full acceleration is a reason to
release.
In addition, if at any point while the glider is still on the ground,
the rope goes slack, release and turn slightly to the side. If you
overrun the slack rope with the wheel you are likely to pick up the
rope with the wheel, and then release is impossible. A very dangerous
situation!!! The turn is best accomplished with a little opposite
aileron to keep the wings level. The L-13's powerful rudder permits
directional control to very slow speeds; aileron persists a little
longer than rudder control as you progressively slow.
5.3 Liftoff.
After there is elevator effect, maintain slight back pressure, letting
the glider climb by almost itself for a couple of seconds, until the
glider is comfortably off the ground -- 3 to six feet -- and the
controls feel firm. Remember that this is a "taildragger," so it will
fly when the wings develop lift.
As the glider lifts from the ground, friction or resistance abruptly
decreases, tension in the rope suddenly diminishes, releasing some of
its elasticity. The acceleration of the tow vehicle does not
immediately take up the slack. A polypropylene or nylon rope is quite
elastic, and when the glider breaks from the ground a remarkable
amount of slack can develop. Fortunately, this elasticity also
imparts some extra speed to the glider, which must be immediately
converted into altitude in order to re-establish tension and continue
a safe climb. The pilot will, with the experience of repeated tows,
learn to anticipate this with a little extra back pressure on the
stick as the glider breaks free of the ground. This back pressure
must be applied smoothly; abrupt movements will cause pilot-induced
oscillation because of the elasticity of the tow rope.
A dacron rope will develop only a little slack; this can usually be
taken out with a subtle increase in back pressure on the stick,
lifting the nose slightly to re-tension the rope, which you will feel
as a resumption of acceleration. Make all control changes gradually,
and wait three to five seconds to assess the effect of any changes
before making another one. If you understand physics, you will
realize that the period of oscillation will be long for a 1500 foot
rope under a couple of thousand pounds of tension, and one strategy of
managing the elevator is to damp these oscillations.
You must nose down and release and land straight ahead if the glider
begins to mush before the slack comes out.
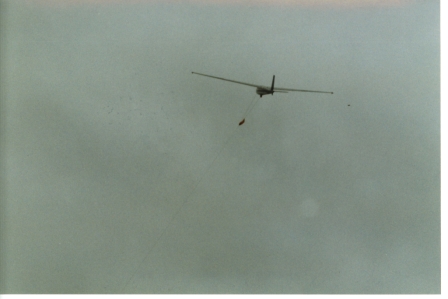
5.4 Initial Climb.
 The resumption of acceleration when the slack comes out is a signal
that the tow is proceeding normally. At this point the tow vehicle is
still accelerating to the agreed upon maximum speed.
You should now round up smoothly and decisively to a steeper climb as
you accelerate further. The climb angle should always be one from
which you could immediately recover without a stall if a rope break
occurred; the target is 45�. A low rope break from a steep slow climb
will cause you to hit the ground feet-first while trying to recover.
This is not what your mom or your friends or even your orthopedic
surgeon really want to see. You should maintain a moderate climb to
about 200 ft agl. My rule on pitch angle is to keep the tow vehicle in
sight over the nose of the glider at first, then to keep the airspeed
comfortably above stall speed, increasing angle of attack smoothly and
gently as the glider accelerates.
Another rule of thumb is to aim for a deck angle (angle of the wingtip
with the horizon) of not more than 15� to about 100 ft, of not more
than 30� to 200 ft, and afterward up to 45� if airspeed permits.
Changes of pitch should occur continuously and gradually, with subtle,
slow corrections.
Once there is sufficient tension in the rope, and with sufficient
power in the tow vehicle, raising the nose of the glider increases
airspeed, lowering the nose reduces airspeed.
5.5 Initial speeds
With a rolling start by the tow vehicle, the elasticity of the rope
will accelerate the glider to a speed a little faster than the truck.
A benefit is that the glider quickly exceeds stall speed by a
comfortable margin. As soon as this happens -- the glider is going
comfortably fast, control authority is firm, it's important to begin
climbing. This picks up any slack from the rope without having to
wait for the truck to itself "catch up." Remember that through all
but the very first part of the tow, the glider will be going faster
than the truck because the truck's speed is magnified by the angle on
the rope, and the earlier this happens, the easier the truck's job is.
Thus one of the most important skills to learn is judging when and by
how much to pick up the nose and begin climbing. This will be a
little different from tow to tow and considerably different from day
to day because of variations in wind conditions, tow vehicle
performance, and driver style. Thus on every flight the challenge is
to recognize the combination of conditions and judge when and by how
much to climb.
5.6 Low rope breaks.
A rope break may be hard to detect. Sometimes it lets go with a sharp
"crack" that will startle you and makes the glider jerk. Your
reaction time will be so fast in this case you'll be surprised to
realize you reacted before the thought was quite formed in your
consciousness that a break had occurred. But more often there's just
a mysterious softness, a very rapid but gentle loss of force.
Thus any loss of acceleration when low must be considered to be a rope
break. Lower the nose immediately to a level or slightly descending
flight attitude and release the rope. Gliders with a tost hook should
pull three times; pilots of Schweizers should confirm that the release
handle feels slack; pilots of the Blanik should pull and hold open
firmly the release for a couple of seconds, and confirm that you hear
an audible click, then repeat (in case only one side released).
Descend immediately into ground effect unless some other action is
obviously correct. This will give you the extra speed that permits
safer maneuvering, e.g., small turns to avoid obstacles; it can be
converted back to altitude if necessary, and the loss of induced drag
in ground effect is the most effective way to conserve energy while
you sort out what to do next. If you need extra "float" for some
reason, extend flaps if you have them.
If you need to get down as quickly as possible, climb to lose speed to
about 5 mph above stall, pull full spoilers, and lower the nose to
maintain a safe airspeed as you descend. Then touch down positively
and apply full brake. This will give you the shortest distance from
decision to full stop, shorter than if you make a hot wheel landing
and pull the brake hard, and safer than a hot touchdown and immediate
ground loop.
If you need to maneuver, do turn, but check wingtip clearance over the
ground. When you are right next to the ground -- lower than about 150
agl -- all turns, even properly coordinated ones, will feel like
skidded turns. This is because you are not on rails, you are in the
air, which is squishy. It's like turning a motorboat: when you turn
the rudder, the boat slides sideways as it begins the turn -- makes
leeway -- and airplanes are not different. We normally don't notice
this, as we're too far from the ground when turning to make it
apparent. So begin the turn well before you need to in order to allow
for the squishiness of the air, make the turn at as high an airspeed
as you can to reduce the risk of stalling in the turn, and bank as
steeply as you can, without touching the tips to the ground, up to 45�
in order to turn rapidly and get through the turn quickly. My
experience is that from 100 ft agl or lower, you'll not be able to
turn more than about 30� from your initial heading unless you have 30
or 40 knots of excess speed above stall.
5.7 Round-up.
The resumption of acceleration when the slack comes out is a signal
that the tow is proceeding normally. At this point the tow vehicle is
still accelerating to the agreed upon maximum speed.
You should now round up smoothly and decisively to a steeper climb as
you accelerate further. The climb angle should always be one from
which you could immediately recover without a stall if a rope break
occurred; the target is 45�. A low rope break from a steep slow climb
will cause you to hit the ground feet-first while trying to recover.
This is not what your mom or your friends or even your orthopedic
surgeon really want to see. You should maintain a moderate climb to
about 200 ft agl. My rule on pitch angle is to keep the tow vehicle in
sight over the nose of the glider at first, then to keep the airspeed
comfortably above stall speed, increasing angle of attack smoothly and
gently as the glider accelerates.
Another rule of thumb is to aim for a deck angle (angle of the wingtip
with the horizon) of not more than 15� to about 100 ft, of not more
than 30� to 200 ft, and afterward up to 45� if airspeed permits.
Changes of pitch should occur continuously and gradually, with subtle,
slow corrections.
Once there is sufficient tension in the rope, and with sufficient
power in the tow vehicle, raising the nose of the glider increases
airspeed, lowering the nose reduces airspeed.
5.5 Initial speeds
With a rolling start by the tow vehicle, the elasticity of the rope
will accelerate the glider to a speed a little faster than the truck.
A benefit is that the glider quickly exceeds stall speed by a
comfortable margin. As soon as this happens -- the glider is going
comfortably fast, control authority is firm, it's important to begin
climbing. This picks up any slack from the rope without having to
wait for the truck to itself "catch up." Remember that through all
but the very first part of the tow, the glider will be going faster
than the truck because the truck's speed is magnified by the angle on
the rope, and the earlier this happens, the easier the truck's job is.
Thus one of the most important skills to learn is judging when and by
how much to pick up the nose and begin climbing. This will be a
little different from tow to tow and considerably different from day
to day because of variations in wind conditions, tow vehicle
performance, and driver style. Thus on every flight the challenge is
to recognize the combination of conditions and judge when and by how
much to climb.
5.6 Low rope breaks.
A rope break may be hard to detect. Sometimes it lets go with a sharp
"crack" that will startle you and makes the glider jerk. Your
reaction time will be so fast in this case you'll be surprised to
realize you reacted before the thought was quite formed in your
consciousness that a break had occurred. But more often there's just
a mysterious softness, a very rapid but gentle loss of force.
Thus any loss of acceleration when low must be considered to be a rope
break. Lower the nose immediately to a level or slightly descending
flight attitude and release the rope. Gliders with a tost hook should
pull three times; pilots of Schweizers should confirm that the release
handle feels slack; pilots of the Blanik should pull and hold open
firmly the release for a couple of seconds, and confirm that you hear
an audible click, then repeat (in case only one side released).
Descend immediately into ground effect unless some other action is
obviously correct. This will give you the extra speed that permits
safer maneuvering, e.g., small turns to avoid obstacles; it can be
converted back to altitude if necessary, and the loss of induced drag
in ground effect is the most effective way to conserve energy while
you sort out what to do next. If you need extra "float" for some
reason, extend flaps if you have them.
If you need to get down as quickly as possible, climb to lose speed to
about 5 mph above stall, pull full spoilers, and lower the nose to
maintain a safe airspeed as you descend. Then touch down positively
and apply full brake. This will give you the shortest distance from
decision to full stop, shorter than if you make a hot wheel landing
and pull the brake hard, and safer than a hot touchdown and immediate
ground loop.
If you need to maneuver, do turn, but check wingtip clearance over the
ground. When you are right next to the ground -- lower than about 150
agl -- all turns, even properly coordinated ones, will feel like
skidded turns. This is because you are not on rails, you are in the
air, which is squishy. It's like turning a motorboat: when you turn
the rudder, the boat slides sideways as it begins the turn -- makes
leeway -- and airplanes are not different. We normally don't notice
this, as we're too far from the ground when turning to make it
apparent. So begin the turn well before you need to in order to allow
for the squishiness of the air, make the turn at as high an airspeed
as you can to reduce the risk of stalling in the turn, and bank as
steeply as you can, without touching the tips to the ground, up to 45�
in order to turn rapidly and get through the turn quickly. My
experience is that from 100 ft agl or lower, you'll not be able to
turn more than about 30� from your initial heading unless you have 30
or 40 knots of excess speed above stall.
5.7 Round-up.
 As you make the initial climb, when all the elements of a safe climb
come together -- good airspeed, continuing gentle acceleration, an
eager climb, firm control pressures -- you'll have a sense of well
being. The tow vehicle is hustling down the center of the runway, no
mystery aircraft have shown up ahead of you, the rope's catenary curve
is stable, the ground is dropping away smoothly, there's no crosswind
drift.
This point turns out to be about 200 ft agl, but more important is the
sense of assurance, as your mind habitually reviews the elements of
flight, that the launch is going well. Without this sense, you should
release and land straight ahead.
With the awareness that altitude and airspeed are comfortable, you
smoothly round up to a steep climb. Your goal is a 45� pitch angle,
although airspeed and control feel may require a shallower climb. A
steeper climb should not be used because of the risk of an accelerated
stall and sharp nose-down pitch if this happens. The acceleration
creates an illusion that the pitch is much greater than it is, so you
must glance repeatedly at the angle between the wing (or any normally-
level piece of the glider) and the horizon to ensure that you are
pitched up enough. With a nice long runway, you may likely find that
a 30� climb is enough (and will give many fewer rope breaks).
At this point you become very focused. The most important factor is
airspeed, then pitch angle, control effectiveness, bank angle (if
there's a crosswind), and sound. As you gain experience, sounds will
tell you how tense the rope is, and after a few rope breaks, your
subconscious will know it's imminent before it happens. It's not the
sound of the wind; it's the vibration of the rope, like a giant violin
string, being transmitted to the glider.
The timing and rate of the round-up are the keys to a good launch.
The tow vehicle, with a maximum speed of about 55 mph, is going just
slightly faster than stall, and the driver is planning to slow down to
about 40 mph, below the stall speed of the glider. You are like an
ice-skater playing crack-the-whip with your friends. The resistance
of the rope allows you to accelerate along a vector that's oblique to
the direction of travel of the tow vehicle, multiplying the force
generated by lift and the acceleration that translates into speed, by
the secant of the angle between the rope and the ground (which
increases from 1 at zero degrees to infinity at 90�).
If the roundup is done too early, the glider will be slow, risking a
stall at low altitude; the tow vehicle will be too slow to support the
rapid acceleration that occurs in the steep phase of climb; and the
angle of attack will be large, generating induced drag that hinders
acceleration; and the glider ends up with a slow, mushing climb that
gains little altitude.
If the roundup is done late, the glider may already be near autotow
redline, with little room for additional acceleration that comes with
climb; the truck may already be in second gear, with less torque
available to support the abrupt need for additional acceleration, and
the glider ends up with a flat, fast flight that gains little
altitude.
Tow vehicle acceleration is an important variable that will affect
when and how you transition to climb. The more powerful the truck,
the less you have to think about how this affects your own
performance, for it will be at or near the maximum tow speed by the
time you round up to climb. A truck that accelerates more slowly may
still be accelerating as strongly as it can while you are rounding up
to climb, or the strong pull of transitioning to a steep climb may
hinder its acceleration and keep you from gaining airspeed as you
should when you lift the nose of the glider.
An abrupt transition to climb can have the same consequence as any
abrupt control movement: a stall. If the Critical Angle of Attack
(AOA) of about 15-18� is exceeded, the glider will stall at any
airspeed. In addition, induced drag increases dramatically. As
induced drag is related to both angle of attack and airspeed. If the
angle of attack is kept relatively constant, then the drag increases
as airspeed increases. At a low airspeed, induced drag is low and the
tow vehicle can accelerate briskly. If the angle of attack is
increased dramatically, the additional induced drag may retard the
vehicles' acceleration enough to alarm the pilot, who is expecting a
brisk acceleration in climb.
If the pilot coordinates the roundup just right, and the truck is
strong, a dramatic climb of about 10 meters a second begins, with a
smooth increase in airspeed to near autotow redline, and a rapid
ascent to the maximal attainable altitude, about 70% of the rope
length (higher climbs, to about 80% of rope length are possible, but
rope breaks are frequent).
5.8 Climb.
The chief goal during the climb is to keep the airspeed above stall
and below the autotow redline airspeed. This is not hard, with
frequent glances at the ASI, and cautions changes in stick pressure.
The thing to remember is that an airspeed change is not an emergency
that requires a jerk on the stick. An airspeed change requires a
prompt change in stick pressure, but not stick movement. A change in
pressure produces a smooth, gradual response in the glider's attitude.
Be gradual, use pressure, be smooth!
To avoid PIO, pilot-induced oscillation, the pilot must respond, not
to airspeed, but to the airspeed trend plus the airspeed. For
example, if the airspeed is stable, either at the lower or the higher
end of the airspeed range, nothing really needs to be done unless the
glider is climbing poorly.
- If the airspeed is in the lower end of the desired range and
decreasing, then back pressure is increased. This increases rope
tension, climb rate, and airspeed.
- If the airspeed is in the upper end of the desired range and is
increasing, then back pressure is decreased. This decreases rope
tension, airspeed, and climb rate.
Jerking the stick around in response to airspeed changes
causes PIO, pilot-induced oscillation. Consider the glider to be at
the end of a very long elastic cord. Jerking the cord will make it
start to bounce, a scary thing for the neophyte pilot. This
oscillation can easily cause a premature rope break. If it develops,
you must discipline yourself to make very slow changes in stick
pressure. Make a small change, hold it there for three or four
seconds, then make another small change.
5.9 PIO.
Pilot-induced oscillations are a feature of many phases of aircraft
training. They occur because we (the pilots) are manipulating dynamic
systems, including some dynamically unstable systems. The way to
avoid PIO's of all types are to make no sudden movements, and to stay
ahead of the aircraft by changing control pressures in response
trends, not in reaction to what happened two seconds ago.
PIO during a ground launch usually begins when the pilot hasn't been
scanning the ASI frequently, and suddenly notices the needle is above
the autotow redline. Fearful of the unknown over-redline-disaster,
whatever that is, he abruptly pushes the stick forward, quickly
putting the needle on the correct side of the redline. This makes the
rope rather slack, and the glider quickly slows a great deal more than
expected; after all, it's climbing at about 45�. The tow vehicle is
hustling along, quickly takes out the slack, and the line tenses
again. Just about this time, the glider pilot has become alarmed at
how fast the ASI needle is swinging toward the white mark of the stall
speed, and quickly pulls the stick back to make it stop falling. The
needle stops, but the back stick has increased the climb angle just as
the rope goes taught again. There's a whoosh of acceleration and the
ASI needle swings toward the high side all too rapidly.
At this point the instructor in the back seat -- or something in the
pilot's memory -- should say, "Just relax the back pressure a little
and hold it there; and wait a couple of seconds, to see what happens."
Once the changes are made gently and slowly (technically, more slowly
than the period of oscillation of the glider-rope unit), the PIO goes
away.
5.10 Autotow redline.
This brings up the question, What happens if you exceed the redline
airspeed, anyway? Glad you asked.
The main risk of exceeding the glider's redline ground-launch airspeed
in autotow launches, as long as you use a rope of proper breaking
strength, is the increased risk of a rope break. The glider won't
break, and you won't get funny aerodynamics. If you use a strong rope
or wire without a proper weak link, there is a risk of breaking the
wings off the glider, which is hard on everyone involved, especially
the survivors. For those of you ancient enough to own a copy of the
American Soaring Handbook, check out Volume 3, Ground Launch,
especially pages 69 to 74, on the load factors involved in winch
launching.
Autotow launching is different from winch launching in that there is
never a force pulling the glider toward the tow vehicle, but the
physics are otherwise the same. It is worth an hour of your time to
study and think about the facts in these pages, but the most important
point for safety is that the load factor on the wings which is not
felt by the pilot, increases dramatically at the top of the tow, as
the rope becomes close to vertical. A gust on top can cause the
strain on the wings to suddenly exceed the wings' strength. Thus the
time for the pilot to pull up steeply is at the beginning of the
launch, not at the end.
A corollary is that if the redline airspeed is exceeded, lowering the
nose (decreasing the angle of attack) will significantly decrease the
load on the airframe. Lowering the nose is always the right thing to
do when the airspeed is high.
5.11 Crosswind correction.
If there is a crosswind, the main concern is where the rope will drop.
It takes several seconds for the rope to fully drop, and during this
time it is carried by the wind wherever the wind wishes. The effect
of a crosswind on the glider is far less than on the rope.
It is important for the pilot to understand that the glider's rudder,
although powerful, is useless for crosswind correction. This is
because the rope provides a powerful force to keep the glider in line
with the truck's travel, and when the glider is climbing in a
crosswind and the pilot applies rudder, the glider will crab, but its
direction of travel changes only subtly. The pilot applies rudder,
but can't see his ground track. The wing runner will notice the
glider crabbing along, right down the runway centerline. The crab
prevents the glider from blowing downwind, but more than this is
necessary to ensure that the rope drops safely on or near the runway.
The only effective way to correct for crosswind on tow is with bank.
(This is also true during aerotow launching, but few teach this.)
Think of the glider as being on the surface of a sphere, with the tow
truck at the center and the rope pulling the glider toward the center.
The glider will be happy anywhere on the surface of the sphere. Bank
moves the glider down the side of this sphere in proportion to the
degree of bank. This effectively displaces the glider from the runway
centerline. You will want to use some top rudder to keep the glider
pointed straight forward.
It turns out that ten or fifteen degrees of bank are powerfully
effective in bringing the glider off to the upwind side during the
climb, and a little top rudder will keep the nose of the glider
reasonably straight. In the Blanik, it's good to avoid a lot of yaw,
as this puts all the tension on one side of the bridle, and the slack
side will release prematurely. This does not affect control; in fact,
the only sensation for the pilot is an audible soft "click." This
usually happens near the top of the climb, and no special action needs
to be taken. Experience is the only way to learn how much bank is
required for a given amount of crosswind; I'd recommend starting with
about 15� and see where the rope drops. Remember, you must be 200
feet or more upwind of the runway center line in order to allow for
the drift of the rope.
Some pilots teach that crosswind correction should be accomplished by
turning after reaching the top of climb. This seems like a good idea.
The drill is to level off when the rate of climb dissipates (due to
the tow vehicle slowing at the end of the runway), turn into the wind,
and fly a couple hundred feet upwind. In my experience, this works
poorly in the Blanik because pilots characteristically underestimate
the amount of correction needed, causing the rope and bridle fall into
the corn field anyway, and that the rope often bows backward due to
the force of the air flow after tension is released by leveling off,
and back releases before the pilot has finished the upwind turn. This
works better when the nose hook is used for launch, as that doesn't
back release so well. Another reason to prefer the ground launch
bridle for ground launching, in my opinion.
5.12 Wind shear.
In a perfectly flown climb in still air, the glider's wingtips will be
at a constant angle with the horizon for about half the climb. Then
airspeed will increase significantly due to the increasing angle
through which the speed of the truck is applied. There are two
possible responses: one is to decrease the glider's angle of climb,
gradually rounding off during the last half of the climb. This
significantly reduces the maximum possible altitude.
A better tactic is to gradually slow the tow vehicle by about 15 mph
during the last half of the ascent. This permits the pilot to
maintain a steep climb angle and achieve maximum altitude with the
shortest ground run.
This ideal is realized only in still air. If there is any surface
wind, there will be shear. My experience is that if the wind is above
about 10 knots and the air stable, you can expect shear. (Unstable
air tends to promote vertical mixing that abolishes shear but causes
gusts.) This shear tends to be abrupt rather than gradual, and most
commonly occurs at about 600 ft agl. Sometimes there are two shear
lines, at around 300 and around 700 feet agl. (These altitudes are
approximate and typical).
This shear is experienced as a rapid increase (rarely a decrease) in
airspeed, usually five to 10 knots, through a short distance of climb.
This sometimes is so dramatic as to require the glider to almost level
off in order to keep below autotow redline. If leveling off is
necessary, climb performance suffers.
It really isn't possible for pilot and driver to communicate well.
Unfortunately, it isn't possible for the tow driver to accurately
judge the glider's altitude or speed; shouted instructions over the
radio from the glider pilot are always hurried and usually
unintelligible. The time required to communicate with signals -- to
wag the glider's tail, the driver to see and understand, and to slow
down, is too long. We've never been able to effectively communicate
between the driver and glider. That is, sometimes it works, but too
often it doesn't; if you can't count on it, it ain't reliable; if it
ain't reliable, it won't work in an emergency. So the pilot should
act in response to any problem, not talk about it.
This shear is usually "veered" with respect to the surface wind in the
northern hemisphere. That is, its direction is more from the pilot's
right, from a numerically higher point on the compass. The Coriolis
force rears its head again!
5.13 Roundoff.
As you make the initial climb, when all the elements of a safe climb
come together -- good airspeed, continuing gentle acceleration, an
eager climb, firm control pressures -- you'll have a sense of well
being. The tow vehicle is hustling down the center of the runway, no
mystery aircraft have shown up ahead of you, the rope's catenary curve
is stable, the ground is dropping away smoothly, there's no crosswind
drift.
This point turns out to be about 200 ft agl, but more important is the
sense of assurance, as your mind habitually reviews the elements of
flight, that the launch is going well. Without this sense, you should
release and land straight ahead.
With the awareness that altitude and airspeed are comfortable, you
smoothly round up to a steep climb. Your goal is a 45� pitch angle,
although airspeed and control feel may require a shallower climb. A
steeper climb should not be used because of the risk of an accelerated
stall and sharp nose-down pitch if this happens. The acceleration
creates an illusion that the pitch is much greater than it is, so you
must glance repeatedly at the angle between the wing (or any normally-
level piece of the glider) and the horizon to ensure that you are
pitched up enough. With a nice long runway, you may likely find that
a 30� climb is enough (and will give many fewer rope breaks).
At this point you become very focused. The most important factor is
airspeed, then pitch angle, control effectiveness, bank angle (if
there's a crosswind), and sound. As you gain experience, sounds will
tell you how tense the rope is, and after a few rope breaks, your
subconscious will know it's imminent before it happens. It's not the
sound of the wind; it's the vibration of the rope, like a giant violin
string, being transmitted to the glider.
The timing and rate of the round-up are the keys to a good launch.
The tow vehicle, with a maximum speed of about 55 mph, is going just
slightly faster than stall, and the driver is planning to slow down to
about 40 mph, below the stall speed of the glider. You are like an
ice-skater playing crack-the-whip with your friends. The resistance
of the rope allows you to accelerate along a vector that's oblique to
the direction of travel of the tow vehicle, multiplying the force
generated by lift and the acceleration that translates into speed, by
the secant of the angle between the rope and the ground (which
increases from 1 at zero degrees to infinity at 90�).
If the roundup is done too early, the glider will be slow, risking a
stall at low altitude; the tow vehicle will be too slow to support the
rapid acceleration that occurs in the steep phase of climb; and the
angle of attack will be large, generating induced drag that hinders
acceleration; and the glider ends up with a slow, mushing climb that
gains little altitude.
If the roundup is done late, the glider may already be near autotow
redline, with little room for additional acceleration that comes with
climb; the truck may already be in second gear, with less torque
available to support the abrupt need for additional acceleration, and
the glider ends up with a flat, fast flight that gains little
altitude.
Tow vehicle acceleration is an important variable that will affect
when and how you transition to climb. The more powerful the truck,
the less you have to think about how this affects your own
performance, for it will be at or near the maximum tow speed by the
time you round up to climb. A truck that accelerates more slowly may
still be accelerating as strongly as it can while you are rounding up
to climb, or the strong pull of transitioning to a steep climb may
hinder its acceleration and keep you from gaining airspeed as you
should when you lift the nose of the glider.
An abrupt transition to climb can have the same consequence as any
abrupt control movement: a stall. If the Critical Angle of Attack
(AOA) of about 15-18� is exceeded, the glider will stall at any
airspeed. In addition, induced drag increases dramatically. As
induced drag is related to both angle of attack and airspeed. If the
angle of attack is kept relatively constant, then the drag increases
as airspeed increases. At a low airspeed, induced drag is low and the
tow vehicle can accelerate briskly. If the angle of attack is
increased dramatically, the additional induced drag may retard the
vehicles' acceleration enough to alarm the pilot, who is expecting a
brisk acceleration in climb.
If the pilot coordinates the roundup just right, and the truck is
strong, a dramatic climb of about 10 meters a second begins, with a
smooth increase in airspeed to near autotow redline, and a rapid
ascent to the maximal attainable altitude, about 70% of the rope
length (higher climbs, to about 80% of rope length are possible, but
rope breaks are frequent).
5.8 Climb.
The chief goal during the climb is to keep the airspeed above stall
and below the autotow redline airspeed. This is not hard, with
frequent glances at the ASI, and cautions changes in stick pressure.
The thing to remember is that an airspeed change is not an emergency
that requires a jerk on the stick. An airspeed change requires a
prompt change in stick pressure, but not stick movement. A change in
pressure produces a smooth, gradual response in the glider's attitude.
Be gradual, use pressure, be smooth!
To avoid PIO, pilot-induced oscillation, the pilot must respond, not
to airspeed, but to the airspeed trend plus the airspeed. For
example, if the airspeed is stable, either at the lower or the higher
end of the airspeed range, nothing really needs to be done unless the
glider is climbing poorly.
- If the airspeed is in the lower end of the desired range and
decreasing, then back pressure is increased. This increases rope
tension, climb rate, and airspeed.
- If the airspeed is in the upper end of the desired range and is
increasing, then back pressure is decreased. This decreases rope
tension, airspeed, and climb rate.
Jerking the stick around in response to airspeed changes
causes PIO, pilot-induced oscillation. Consider the glider to be at
the end of a very long elastic cord. Jerking the cord will make it
start to bounce, a scary thing for the neophyte pilot. This
oscillation can easily cause a premature rope break. If it develops,
you must discipline yourself to make very slow changes in stick
pressure. Make a small change, hold it there for three or four
seconds, then make another small change.
5.9 PIO.
Pilot-induced oscillations are a feature of many phases of aircraft
training. They occur because we (the pilots) are manipulating dynamic
systems, including some dynamically unstable systems. The way to
avoid PIO's of all types are to make no sudden movements, and to stay
ahead of the aircraft by changing control pressures in response
trends, not in reaction to what happened two seconds ago.
PIO during a ground launch usually begins when the pilot hasn't been
scanning the ASI frequently, and suddenly notices the needle is above
the autotow redline. Fearful of the unknown over-redline-disaster,
whatever that is, he abruptly pushes the stick forward, quickly
putting the needle on the correct side of the redline. This makes the
rope rather slack, and the glider quickly slows a great deal more than
expected; after all, it's climbing at about 45�. The tow vehicle is
hustling along, quickly takes out the slack, and the line tenses
again. Just about this time, the glider pilot has become alarmed at
how fast the ASI needle is swinging toward the white mark of the stall
speed, and quickly pulls the stick back to make it stop falling. The
needle stops, but the back stick has increased the climb angle just as
the rope goes taught again. There's a whoosh of acceleration and the
ASI needle swings toward the high side all too rapidly.
At this point the instructor in the back seat -- or something in the
pilot's memory -- should say, "Just relax the back pressure a little
and hold it there; and wait a couple of seconds, to see what happens."
Once the changes are made gently and slowly (technically, more slowly
than the period of oscillation of the glider-rope unit), the PIO goes
away.
5.10 Autotow redline.
This brings up the question, What happens if you exceed the redline
airspeed, anyway? Glad you asked.
The main risk of exceeding the glider's redline ground-launch airspeed
in autotow launches, as long as you use a rope of proper breaking
strength, is the increased risk of a rope break. The glider won't
break, and you won't get funny aerodynamics. If you use a strong rope
or wire without a proper weak link, there is a risk of breaking the
wings off the glider, which is hard on everyone involved, especially
the survivors. For those of you ancient enough to own a copy of the
American Soaring Handbook, check out Volume 3, Ground Launch,
especially pages 69 to 74, on the load factors involved in winch
launching.
Autotow launching is different from winch launching in that there is
never a force pulling the glider toward the tow vehicle, but the
physics are otherwise the same. It is worth an hour of your time to
study and think about the facts in these pages, but the most important
point for safety is that the load factor on the wings which is not
felt by the pilot, increases dramatically at the top of the tow, as
the rope becomes close to vertical. A gust on top can cause the
strain on the wings to suddenly exceed the wings' strength. Thus the
time for the pilot to pull up steeply is at the beginning of the
launch, not at the end.
A corollary is that if the redline airspeed is exceeded, lowering the
nose (decreasing the angle of attack) will significantly decrease the
load on the airframe. Lowering the nose is always the right thing to
do when the airspeed is high.
5.11 Crosswind correction.
If there is a crosswind, the main concern is where the rope will drop.
It takes several seconds for the rope to fully drop, and during this
time it is carried by the wind wherever the wind wishes. The effect
of a crosswind on the glider is far less than on the rope.
It is important for the pilot to understand that the glider's rudder,
although powerful, is useless for crosswind correction. This is
because the rope provides a powerful force to keep the glider in line
with the truck's travel, and when the glider is climbing in a
crosswind and the pilot applies rudder, the glider will crab, but its
direction of travel changes only subtly. The pilot applies rudder,
but can't see his ground track. The wing runner will notice the
glider crabbing along, right down the runway centerline. The crab
prevents the glider from blowing downwind, but more than this is
necessary to ensure that the rope drops safely on or near the runway.
The only effective way to correct for crosswind on tow is with bank.
(This is also true during aerotow launching, but few teach this.)
Think of the glider as being on the surface of a sphere, with the tow
truck at the center and the rope pulling the glider toward the center.
The glider will be happy anywhere on the surface of the sphere. Bank
moves the glider down the side of this sphere in proportion to the
degree of bank. This effectively displaces the glider from the runway
centerline. You will want to use some top rudder to keep the glider
pointed straight forward.
It turns out that ten or fifteen degrees of bank are powerfully
effective in bringing the glider off to the upwind side during the
climb, and a little top rudder will keep the nose of the glider
reasonably straight. In the Blanik, it's good to avoid a lot of yaw,
as this puts all the tension on one side of the bridle, and the slack
side will release prematurely. This does not affect control; in fact,
the only sensation for the pilot is an audible soft "click." This
usually happens near the top of the climb, and no special action needs
to be taken. Experience is the only way to learn how much bank is
required for a given amount of crosswind; I'd recommend starting with
about 15� and see where the rope drops. Remember, you must be 200
feet or more upwind of the runway center line in order to allow for
the drift of the rope.
Some pilots teach that crosswind correction should be accomplished by
turning after reaching the top of climb. This seems like a good idea.
The drill is to level off when the rate of climb dissipates (due to
the tow vehicle slowing at the end of the runway), turn into the wind,
and fly a couple hundred feet upwind. In my experience, this works
poorly in the Blanik because pilots characteristically underestimate
the amount of correction needed, causing the rope and bridle fall into
the corn field anyway, and that the rope often bows backward due to
the force of the air flow after tension is released by leveling off,
and back releases before the pilot has finished the upwind turn. This
works better when the nose hook is used for launch, as that doesn't
back release so well. Another reason to prefer the ground launch
bridle for ground launching, in my opinion.
5.12 Wind shear.
In a perfectly flown climb in still air, the glider's wingtips will be
at a constant angle with the horizon for about half the climb. Then
airspeed will increase significantly due to the increasing angle
through which the speed of the truck is applied. There are two
possible responses: one is to decrease the glider's angle of climb,
gradually rounding off during the last half of the climb. This
significantly reduces the maximum possible altitude.
A better tactic is to gradually slow the tow vehicle by about 15 mph
during the last half of the ascent. This permits the pilot to
maintain a steep climb angle and achieve maximum altitude with the
shortest ground run.
This ideal is realized only in still air. If there is any surface
wind, there will be shear. My experience is that if the wind is above
about 10 knots and the air stable, you can expect shear. (Unstable
air tends to promote vertical mixing that abolishes shear but causes
gusts.) This shear tends to be abrupt rather than gradual, and most
commonly occurs at about 600 ft agl. Sometimes there are two shear
lines, at around 300 and around 700 feet agl. (These altitudes are
approximate and typical).
This shear is experienced as a rapid increase (rarely a decrease) in
airspeed, usually five to 10 knots, through a short distance of climb.
This sometimes is so dramatic as to require the glider to almost level
off in order to keep below autotow redline. If leveling off is
necessary, climb performance suffers.
It really isn't possible for pilot and driver to communicate well.
Unfortunately, it isn't possible for the tow driver to accurately
judge the glider's altitude or speed; shouted instructions over the
radio from the glider pilot are always hurried and usually
unintelligible. The time required to communicate with signals -- to
wag the glider's tail, the driver to see and understand, and to slow
down, is too long. We've never been able to effectively communicate
between the driver and glider. That is, sometimes it works, but too
often it doesn't; if you can't count on it, it ain't reliable; if it
ain't reliable, it won't work in an emergency. So the pilot should
act in response to any problem, not talk about it.
This shear is usually "veered" with respect to the surface wind in the
northern hemisphere. That is, its direction is more from the pilot's
right, from a numerically higher point on the compass. The Coriolis
force rears its head again!
5.13 Roundoff.
 There are three ways to decide when the climb is over.
- Agree not to exceed a certain altitude. Rope breaks are frequent
if the altitude gained is more than about 2/3 of the rope's
length, so setting an upper altitude limit saves time and
annoyance. We have found a limit of 1100 ft agl with a rope
length of 1500 ft. to be satisfactory; 1200 ft also has pretty
tolerable results. Macho contests for release altitude just break
the rope.
- Notice that the glider must round off to keep the airspeed below
redline. This usually happens to some extent with a well-managed
tow.
- Notice that the glider's climb rate and airspeed are slowing
despite maintaining a high climb angle. This means that the tow
vehicle is slowing, usually because of running out of runway.
This is a clear signal to level off and release, as otherwise
you'll stall at a steep pitch angle, and give away altitude
needlessly, and near the top of the tow the airframe is being
stressed.
5.14 Release.
Here's the easy part. Level off to ease the rope tension, turn
upwind, and pull the yellow handle. In a Schweizer, release is
confirmed by a click and by the loss of resistance to pulling. If you
have a Tost ring, pull thrice to make sure you have complete release.
In the Blanik, pull the release and hold it fully open for a couple of
seconds, and repeat, especially if you do not hear a click.
It's a good idea to have a little tension on the rope when you release
it, as this not only helps pull the metal out of the clip, but ensures
that there's an audible click and a palpable bump when release is
successful. It woke me up one day when I pulled the release handle
gently, turned upwind to find a thermal, and then heard on the radio,
"Tow vehicle to glider, please release the rope!" A quick firm pull
on the yellow handle fixed that one!
There is sometimes enough windage on the rope, especially if a flag
has been attached to the ground launch bridle to aid finding it, that
near the end of the tow, the bridle's rope goes beyond vertical and
back releases. Unless the rope on each side of the bridle is exactly
the same length, one side will back-release before the other. So
don't take a click as a sign that both sides are gone. There is,
surprisingly, no tendency of the glider to yaw when one side releases
at altitude, and it is possible to continue climbing with only one
side connected, as I have done many times for one or two hundred feet
(though never climbing aggressively).
In any case, if you have any doubt that the rope released properly,
fly straight ahead, over and beyond the tow vehicle, and the back-
release will free the rope. And if that does not work, the rope will
break if it's properly weak. I hope. We've never had a release
failure: we keep the mechanism clean and lubricated, we test it for
proper operation before the first flight and frequently thereafter,
and we clean the clips after every tow.
5.15 Review
As with many things, actually flying the launch is the simple part of
the process. Before we do this, many details must be resolved.
To review, the stages of the launch are:
- Rope tensioning
- Ground roll
- Liftoff
- Initial climb
- Roundup
- Steep climb
- Airspeed management
- Avoid PIO
- Crosswind correction with bank
- Roundoff
- Back release
- Pilot release
Copyright © 2000, 2002 Daniel L. Johnson; all rights reserved.
There are three ways to decide when the climb is over.
- Agree not to exceed a certain altitude. Rope breaks are frequent
if the altitude gained is more than about 2/3 of the rope's
length, so setting an upper altitude limit saves time and
annoyance. We have found a limit of 1100 ft agl with a rope
length of 1500 ft. to be satisfactory; 1200 ft also has pretty
tolerable results. Macho contests for release altitude just break
the rope.
- Notice that the glider must round off to keep the airspeed below
redline. This usually happens to some extent with a well-managed
tow.
- Notice that the glider's climb rate and airspeed are slowing
despite maintaining a high climb angle. This means that the tow
vehicle is slowing, usually because of running out of runway.
This is a clear signal to level off and release, as otherwise
you'll stall at a steep pitch angle, and give away altitude
needlessly, and near the top of the tow the airframe is being
stressed.
5.14 Release.
Here's the easy part. Level off to ease the rope tension, turn
upwind, and pull the yellow handle. In a Schweizer, release is
confirmed by a click and by the loss of resistance to pulling. If you
have a Tost ring, pull thrice to make sure you have complete release.
In the Blanik, pull the release and hold it fully open for a couple of
seconds, and repeat, especially if you do not hear a click.
It's a good idea to have a little tension on the rope when you release
it, as this not only helps pull the metal out of the clip, but ensures
that there's an audible click and a palpable bump when release is
successful. It woke me up one day when I pulled the release handle
gently, turned upwind to find a thermal, and then heard on the radio,
"Tow vehicle to glider, please release the rope!" A quick firm pull
on the yellow handle fixed that one!
There is sometimes enough windage on the rope, especially if a flag
has been attached to the ground launch bridle to aid finding it, that
near the end of the tow, the bridle's rope goes beyond vertical and
back releases. Unless the rope on each side of the bridle is exactly
the same length, one side will back-release before the other. So
don't take a click as a sign that both sides are gone. There is,
surprisingly, no tendency of the glider to yaw when one side releases
at altitude, and it is possible to continue climbing with only one
side connected, as I have done many times for one or two hundred feet
(though never climbing aggressively).
In any case, if you have any doubt that the rope released properly,
fly straight ahead, over and beyond the tow vehicle, and the back-
release will free the rope. And if that does not work, the rope will
break if it's properly weak. I hope. We've never had a release
failure: we keep the mechanism clean and lubricated, we test it for
proper operation before the first flight and frequently thereafter,
and we clean the clips after every tow.
5.15 Review
As with many things, actually flying the launch is the simple part of
the process. Before we do this, many details must be resolved.
To review, the stages of the launch are:
- Rope tensioning
- Ground roll
- Liftoff
- Initial climb
- Roundup
- Steep climb
- Airspeed management
- Avoid PIO
- Crosswind correction with bank
- Roundoff
- Back release
- Pilot release
Copyright © 2000, 2002 Daniel L. Johnson; all rights reserved.