2 Equipment
2.1 Runway. 2.2 Short Runways 2.2.1 Bumps versus the tow vehicle. 2.2.2 Runway lights versus the glider. 2.2.3 Pulley Launch. 2.3 The Glider. 2.4 Tow vehicle. 2.5 Release hitch. 2.6 Rope choice. 2.6.1 Testing 2.6.2 Rope Longevity 2.6.3 Rings 2.6.4 Knots and splices 2.6.5 Weak link 2.6.6 Flags on the launch rope 2.6.7 Rope handling 2.7 Release mechanism 2.1 Runway The runway is indeed "a piece of equipment," of the most basic sort. The ideal is a 5,000 foot long paved runway, as this is better for the tow vehicle. (Wear and tear on the tow vehicle is important at least to its owner.) 2.2 Short Runways A shorter paved runway with grass over-runs at one or both ends is quite satisfactory. My experience is that 4,500 feet of linear space is really a minimum for consistently good launches. The drawbacks of the shorter runway are: 2.2.1 Bumps versus the tow vehicle. There is often a "step" at the end of the runway, a bump over which the tow vehicle must pass, under power, at 30 to 45 miles per hour. This is hard on CV joints and erodes the owner's kindly feelings. 2.2.2 Runway lights versus the glider. Runway lights usually are positioned at the ends of the pavement as well as the sides. These are a minimal hazard, as they break away when hit, but do make little dents in the truck or glider that are cosmetically troublesome, especially to the owners, and make it hard to deflect blame. Breaking them is costly, and scores no points with the airport manager. There is, however, always a gap in the middle through which the tow vehicle can be driven when necessary. A mid to high wing glider such as the Blanik or Schweizer 2-33 can taxi through them in an urgency, with care to make sure there's enough speed to maintain aileron effectiveness. Umm.. I remember sitting in the spectator seat of my L-13 once as a friend rolled out after landing. "I don't think you're going to make it through the end lights!" "Naw, we'll make it!" "The ailerons aren't going to be working." "Sure, they're fine!" Crunch. "Sorry." About $200 sorry, and that was only the light; we didn't fix the tiny ding in the L-13's wing, one of many. If we taxi through and over runway lights, we need to have enough airspeed that the ailerons can lift the wings over them. It is possible to make ground launches from the grass over-run, leading the rope through the end lights. We have done this hundreds of times. But it should be done only if - The glider's wings are high enough to clear the lights comfortably while taxiing; - The glider is at a sufficiently high speed when going past (through) the lights such that there is full control effectiveness; ideally it's already well off the ground; - There is enough room, either on landing after touchdown or on takeoff, to bring the glider to a complete stop before reaching the lights, with the use of brakes; - The brakes are effective enough to be trusted. - The PIC is fiscally able to endure the consequences to the glider and the lights of an error in judgment. Short runways (less than 4,500 ft., in my judgment) require the pulley technique. As I have no experience with this technique, I do not have any advice for you. The alternative to the pulley technique is the "elastic launch." I saw this used by a club in south-central Iowa a few years ago. They had only about 75 feet of grass overrun at the end of the runway, a polypropylene rope (lots of stretch), and a spavined old Buick without much low-end torque (any more). ("Elastic launch" is my term...) The drill was to put the glider at the edge of the corn field pointing down the runway centerline, lead the rope through the center of the end-marker lights, and park the tow car well down the runway, off to the side, with lots of slack in the rope. About 200 feet of slack, actually. When all was ready, the wing runner waved the big flag widely, the tow car's driver floored the accelerator and carved a turn out onto the runway, joining up with the centerline and hustling fast into the wind. When the tow car got up to about 30 miles an hour, the glider pilot felt a powerful surge of acceleration -- but not a sharp jerk, thanks to the line's elasticity. The wing runner took about two steps and the wing was snatched from his hand. The glider was aloft after only about 15 feet of ground roll, and over the lights. Now the principle of elasticity finished its cycle, and the rope went slack with the glider just barely above stall speed and about a dozen feet off the runway. If the pilot pulls up too gently, the glider mushes down more or less firmly onto the runway and gets snatched again. If the pilot pulls up too steeply, the glider stalls and falls, possibly injuring itself in the bottom and maybe the pilot, too, who knows? But if the pilot pulls up just enough, the slack is taken up by the beginning of the climb, the car doesn't stall and keeps accelerating, and the launch is successfully under way. This was how I, the passenger, was introduced to auto tow launching, and while it was enormous fun, now that I understand what was happening mechanically and aerodynamically I believe it to be far too risky to be part of a training operation. It belongs in the circus. 2.2.3 Pulley Launch This technique requires the use of a rope of double the length needed for straight autotow launching. A "anchor" vehicle is placed at the far end of the runway, and one end of the rope attached to it. A sturdy pulley, usually made out of an old steel wheel and an axle, is attached to the tow vehicle begins the launch at the anchor vehicle and travels toward the glider. The pulley provides a 2:1 purchase that effectively doubles the speed of the tow vehicle. An advantage of this technique is that the ends of the rope can be "swapped," reducing the time spent in retrieving the rope (assuming that the rope falls from the glider onto an accessible part of the airport, an unreasonable assumption in crosswind conditions). I don't have any experience with this directly. I've heard a talk from pilots in the Southern US who have used this successfully; I've also heard from a pilot who saw a pulley launch done wrong -- the tow car went "full speed" instead of "half speed," and it pulled the wings off the glider (just as a winch launch can do) and he saw his friend die. So it has to be done right. I'll let someone else tell you how to do it safely. 2.3 The Glider It is a pretty good idea to use a glider that's approved for ground launching by the manufacturer. I haven't researched which are and are not, but would be very reluctant to use one that had only a nose hook for towing, without the specific approbation of the manufacturer. A CG hook is preferred to a nose hook, as ground launching with a nose hook places excessive strain both on the nose hook (a downward force vector that it may not be designed for) and on the empennage (continuous maximum nose-up pitch force to counteract the downward pull on the nose). Having said this, I know that in Ames, IA, the club has been auto-launching their Blanik for years using the nose hook without any problems of which I'm aware. My own experience is that using the CG hook gets much better launches; the altitude and rate of climb are much easier to control with the CG hook. Using the nose hook, basically the technique is just "full back stick" all the way up, and the climb is very gently, the maximum altitude rather limited. Using the CG hook, the climb can be about as steep as you want within the strength of the weak link, and full elevator effectiveness is preserved throughout the climb. I have observed that the greater elevator control with the CG hook does make PIO a little more likely for the nervous, inexperience pilot during climbout. More on this later; it's easy to eliminate or control by making corrections slowly; often be swift, never be sudden. 2.4 Tow vehicle A powerful pickup truck is ideal. In my experience, the more power the better. This means using a "full-sized" pickup with at least a V-8 engine. Four wheel drive is not necessary except if pulling from a grass runway (grass is very slippery). An automatic transmission is a must. One shift is necessary during the tow, and few drivers are able to shift a manual transmission with the alacrity required to continue the tow safely, without risking damage to the transmission. In addition, a mechanical clutch is not able to handle repeated heavy starting loads, so premature replacement may be necessary. The tow vehicle and the hitch assembly should be approved by the manufacturers for pulling greater than 2-ton loads, as the rope you should use has an actual breaking strength of almost 2000 lbs. You want the rope to break before the hitch or the bumper comes off the truck... As I mentioned, my first autotow experience was at the hands of a defunct Iowa club, which used a spavined old automobile, with the roof cut off by a welding torch for better visibility. This car didn't have enough torque to launch the glider effectively from a dead stop, so they snatched it up using the elasticity of their polypropylene rope. The piloting challenge was to recognize whether the glider had enough airspeed to, without stalling, take up the slack by pitching up. This had to be done quickly, as the car didn't accelerate well enough to take up the slack on its own before the glider stalled. Do not copy this technique. The tow vehicle must have enough torque to safely launch the glider from a dead stop, or you don't have enough margin for reliably safe launches. Having said this, the launch is much safer, in my judgment, if there's enough slack in the line to let the tow vehicle reach about 12-15 miles an hour. With a 1500-foot dacron rope, there's enough elasticity in the weave and the polymer to prevent a jerk, the tow vehicle is off the weak part of the torque curve, and the glider gains control effectiveness after 75 - 100 feet of ground roll instead of 150-300, which makes the launch safer and more predictable. Rebound slack does not develop with dacron, at this speed. It is fair to pay the tow vehicle's owner something for each tow, as this whole business adds extra wear to the engine and drive train. 2.5 Release hitch Go to the Boys' Toy Store and pick up a hitch in the spare parts department, and a strap hinge that will fit it. Buy a small eye bolt that will fit through one of the holes in the hinge and nuts to hold it on. From the Schweizer Aircraft Company or Wings and Wheels buy a release hook. Now put your pieces together, using dabs of 1-minute epoxy to fasten them in place. Epoxy holds securely, but can be broken free easily if you make a mistake. The epoxy will burn away when the pieces are welded in place. Mount the eye bolt on the hinge, on the middle of one side of the strap, with the eye perpendicular to the long axis of the strap. Mount this strap of the hinge on the top surface of the hitch, with the hinge just off the back edge of the hitch. The hinge itself should be oriented so that the free strap folds up onto the hitch. Then mount the Schweizer release on the free side of the strap hinge, on top of the strap, with the release lever and the release opening on the side toward the hinge. Make sure that it's out far enough on the strap so that the release can open completely and freely, without being stopped by impinging on the hinge itself. The free side of the hinge should be reinforced with a small metal plate welded underneath the hitch to form a T. Now (get out your arc-welding equipment or) take your assembled parts to a welder and have the parts welded in place. Weld the hinge tangs to the strap, so that they can't open up. If this is not done, during one of the first few tows, the metal holding the hinge pin will simply unwrap and the hinge will fall apart, as we discovered just one tow before it happened. Last, take a piece of string long enough to reach from the hitch to the interior of the tow vehicle's cab, tie it onto the release's latch bar, and pass it through the eye bolt so that you have a tow release for the driver. Frankly, you can't see the glider well enough from the truck to tell it's in trouble in time to cut it loose before trouble actually develops -- remember, the glider is 1500 feet away. But you do want to release the rope's lower end immediately after the glider releases, as this makes the retrieve ever so much easier. The hitch assembly is now ready for use. Here are two illustrations of the completed hitch assembly: First, with the hitch open and second, with the hitch closed. (Click on the highlighted word; the illustration will open in a new browser window.) 2.6 Rope choice We ordered dacron rope from David Bradley, C.S.R. Braided Products Division, 330 Airport Road, Lehighton, Pennsylvania, 18235 610-379-5666 (bradley@voicenet.com) You want the longest rope he can provide, at least 1500 feet. Dacron braided rope is, I feel, the best compromise in performance, ease of handling and repair, and cost. Polypropylene (yellow) rope can be used also. It has more elasticity, and so is more prone to pilot-induced oscillation and is more prone to generate slack just as you need to start the initial climb. It is more prone to UV damage. I believe it is cheaper. It is tempting to use jacketed yacht braid, as the longevity should be much greater. But because the cost is many times higher and splicing is a chore, I have not tried this. 2.6.1 Testing I strongly recommend that you test your rope's actual breaking strength with a tensiometer if possible. My experience is that the 3/8 inch dacron rope we buy from David Bradley has a breaking strength when new of about 1800 lb, and that when the strength decreased through wear to less than 1200 pounds we begin experiencing excessive rope breaks. 2.6.2 Rope Longevity The rope lifespan depends mostly on how much towing you do and what are the ground conditions at your field. Abrasion is the biggest factor. Part of the abrasive damage is from being dragged across the ground. Hidden abrasion and weakening occurs from particles of dirt that are picked up in the fibers, that cut or nick the fibers as the rope is worked, especially when tension is applied. Rope will last much longer when used on a grass strip that doesn't have patches of dirt. Rope life will be shortest when used from a gravel runway because of all the sand that is picked up. The greatest wear is at the truck end of the rope. This part of the rope is the last to leave the ground during tow, and experiences the most stress when being dragged back to the launch point. My experience is that most rope breaks occur within the three hundred feet of rope closest to the tow vehicle. We don't swap rope ends to even out wear, because it's desirable to have rope breaks occur close to the truck rather than close to the glider. The weight of the rope hanging from the glider helps ensure that the rope actually releases when the yellow handle is pulled, and in the Blanik, ensures that the round launch bridle drops away when released, rather than wrapping itself around the empennage, as it does when the weak link is located at the front of the bridle. 2.6.3 Rings The Schweizer release used on the tow hitch of course requires a Schweizer ring. At the glider end, use what the glider needs. If you use the Blanik's nose hook, a special ring is needed, smaller than a Schweizer and bigger than a Tost. If you have more than one glider type, use a Schweizer ring at both ends and put the weak link for other gliders on a carabiner that can be quickly snapped onto the Schweizer ring. 2.6.4 Knots and splices Don't tie knots in the rope: this halves its strength. Splicing braided rope is easy, taking advantage of the finger-trap principle to avoid slippage. Buy a set of quarter-inch diameter hollow aluminum knitting needles, and use a pipe cutter to cleanly nip off the end caps. This makes a lovely set of splicing fids, and it's easy to find spares. Splices should be made by running at least three feet of rope, each end inside the other. Weave the rope in and out through this length. This is not quite as strong as unspliced rope, and wears faster, but allows you to preserve most of the rope's length as it ages. The rings should be attached with a wear-resistant loop. To make this, run the fid, pointing toward the bitter end, through the center of a 3-inch section of rope, 18 to 30 inches from the end. Then slip this into the ring so that the section of the rope through which the fid passes is in the ring. Bring the bitter end around and fit it into the fid. Pull the fid and rope through, making a loop to hold the ring. You will notice that this makes a loop of rope forming a jacket for itself. Now thread the fid up the rope from the ring and loop, and nest the loose end of the rope into itself. This makes a strong, simple and abrasion-resistant fixture for the ring, and does not reduce the rope's strength as a knot would. 2.6.5 Weak link The weak link is required to have a breaking strength of 80% to 200% of the maximum gross weight of the glider. This applies to both aerotow and ground launch applications. Anything less than about 115% of the max gross weight is just too weak for autotow launching without excessive rope breaks, in my experience. We tested our tow ropes, and found their strength when new to be about 1800 lb., less than 200% of the Blanik L-13's MGW of 1100 lb. We then dispensed with the weak link, and have found this to be preferable to having one. I recommend that you talk to the industrial engineering department of the closest college and find a tensiometer with which to test your ropes. This will open your eyes. One advantage of having a weak link is to control the point at which breaks occur. Once some wear occurs on the tow rope, nearly all breaks occur down near the tow vehicle. We have learned to prefer this for the following reasons: - The Blanik L-13 has a ground launch bridle that consists of two twenty to twenty five foot lengths of sturdy rope with a metal link at the glider end, joined to a ring that attaches to the tow rope, The weak link is traditionally put between the tow rope and the bridle. Our experience is that when this weak link breaks, the bridle almost always wraps itself around the horizontal stabilizer. The pilot feels a little flutter from the elevator. This is probably not a dangerous flight condition, but the bridle then falls off unpredictably. This means the loss of the 200 dollar bridle, and risks it falling and causing damage to persons or property, not a risk I wish to take. We lost one in a corn field one day... - The weight of the rope helps pull the bridle away from the glider, and causes it to land on the airport in the runway environment immediately after the break. - The windage of the rope pulls the bridle backward, causing the bridle to back-release, sometimes even before the pilot is ready to pull the release handle. If the lengths of rope on the sides of the bridle are slightly unequal, one side will release before the other. This causes no change at all in the way the glider handles, and the risk is that the pilot will hear the click and assume that the rope is gone, and not bother to pull the release. Normally the rope will eventually back-release, but...if the hook gets pulled sideways for some reason it could jam, I think. So when you hear one click, be sure you pull the release fully and firmly anyway. - The bridle and the rope are much easier to find than the bridle alone. (The wind does blow them along...) 2.6.6 Flags on the launch rope. At the conclusion of a launch, the rope drifts along with the wind. As there's usually some crosswind component, the rope is seldom on the runway after it falls, unless the pilot has flown upwind during the launch by just the right distance. If the pilot forgets to correct for the crosswind component or guesses badly, the rope may drift two or three hundred feet sideways, especially after a rope break. Before the launch, consider the worse case: where might the rope fall if the climb is badly managed? Across a row of parked airplanes? On the FBO? Across a factory nearby? Across security fencing topped with razor wire? Across a swamp? Through a woods, or worse, through a brier patch? Sometimes it works to simply pull the rope from one end, but it doesn't work well to pull the ground launch bridle through a hostile environment. Hard on the bridle; hard on the factory, the airplanes, the chain link fencing, or the construction equipment and supplies. We've seen all of these happen except that we didn't ever drop the rope across an airplane. But on some launches, into crosswinds, with some of our student pilots, I confess I was deeply concerned that the launch be flown just right. We didn't ever damage anything by dropping the rope and bridle off the airport, but this was not luck, it took planning and care. I have found that sewing large flags onto the ground launch bridle is invaluable in locating it after release. They make it visible as it falls and after it's disappeared into the tall grass. I went to a fabric store and simply bought two yards of the brightest, most sturdy cloth they had (gold colored, in this instance), then persuaded my spouse to sew them onto the ground launch bridle. Click for a photo of the flags in use. The only disadvantage to using flags is that they create windage, and after leveling off at the top of the climb, after tension is off the rope, this causes the bridle to back release, sometimes only one side releases. The only clue to back release is that a faint "click" is heard. It's necessary to attach a flag to each side of the bridle, as otherwise the windage of the side with the flag will always cause asymmetric back release. This windage is a reason to attach the flags as close to the end of the rope or bridle as possible, as they will cause the rope to bow in the slipstream and to back release. It's important, in the Blanik L-13, to pull the release fully, and to hold it open for a couple of seconds, to give time for a sticky clip to be freed by traction and vibration and pull away. A quick pull and release or multiple quick pulls and releases may not allow it to drop away, and there is no clue in the glider's handling that the rope is still attached. It is helpful for the tow vehicle to confirm visually that the rope has dropped away after release and to radio the glider to provide assurance of this. Attaching flags to the bridle (or rope) is essential to permitting the release to be seen. Back-release failure is rare, but does happen, and is easily remedied by pulling the release and holding it open. The release mechanism is so sturdy and simple that I can't imagine a total failure unless it's been maintained carelessly. 2.6.7 Rope handling I've used a garden-hose reel to roll up and store the rope. These are readily available at home, garden, and discount stores for about $25. The larger ones are easier to handle and more sturdily built, and will last for three or four years. Or you can build something out of metal that you can mount on the box of your pickup. Use leather-palmed gloves when handling the rope. It's pretty abrasive. 2.7 Bridle releaseThe Blanik's CG release mechchanism is an elegantly simple and robust design, but it must be understood and managed properly to avoid trouble. ("Trouble" means premature release of one side at the beginning of the ground roll, which can cause the glider to slew severely; or it means release failure due to sitcking or jamming of the mechanism. We have seen neither, but have heard of this happening.)
Release mechanism. The Blanik's release mechanism provides a
large pin that retracts flush with the fuselage when the release handle
is pulled.

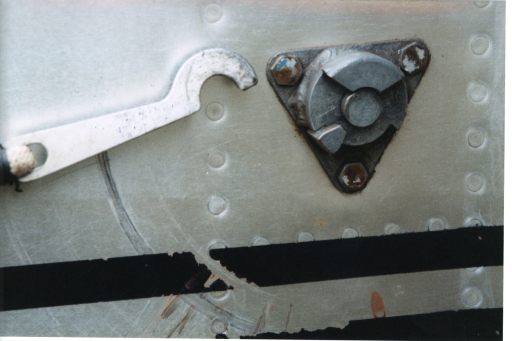
Note in this illustration how the latch is constructed.
This is the port-side release mechanism; the front of the glider
is to your left, the back to your right. Down is down...
At the left you see the hook attached to the ground launch bridle,
ready to be inserted in the release mechanism.
The release mechanism consists of four integrated components:
- The triangular base, bolted to the fuselage, which holds the
the cylindrical pin.
- The top rim of the base is "folded over" making a groove into which the
tip of the hook fits. It is important that this groove be meticuously
cleaned regularly, as crud wanders into it, and crud, as we all know, is
sticky. Stickiness hinders the hook from falling out freely, which we want
very much for it to do when we retract the pin with our left hand on
the yellow handle in the cockpit. During the pre-launch check, the
hooks should be securely inserted into the release mechanisms on both
sides of the glider; and both should fall freely to the
ground when the release is pulled.
- The cylindrical pin is solid and very sturdy. Your task is to make
sure that it is clean and well lubricated, so that pulling the release
handle is free and effortless except for the resistance of the spring
against which you pull.
- The little triangular gizmo at the 8 o'clock position is the back-
release. Pull the release handle so that the pin retracts, slip the
hook into its slot, release the handle, and the pin is secure. Test
the back release by cranking the hook counterclockwise; the gizmo will
rotate freely about 90 degrees and the tip of the hook will no longer
be within the slot at the top, and will fall away.
It is also possible to insert the hook by depressing the release and
rotating the hook counterclockwise into the slot at the top.
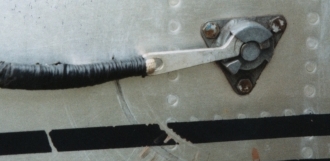 Here we see the hook fitted into the release mechanism, ready to roll.
Note the scratches on the fuselage, made during launches as the rope
becomes more vertical during climb, and note that the tip of the hook
must eventually fall out of the groove that holds it as the rope's
angle goes past 90 degrees.
The release on the starboard side is the mirror image, in case you
were wondering....
Copyright © 2000, 2002 Daniel L. Johnson; all rights reserved.
Here we see the hook fitted into the release mechanism, ready to roll.
Note the scratches on the fuselage, made during launches as the rope
becomes more vertical during climb, and note that the tip of the hook
must eventually fall out of the groove that holds it as the rope's
angle goes past 90 degrees.
The release on the starboard side is the mirror image, in case you
were wondering....
Copyright © 2000, 2002 Daniel L. Johnson; all rights reserved.